Apr 182012
 

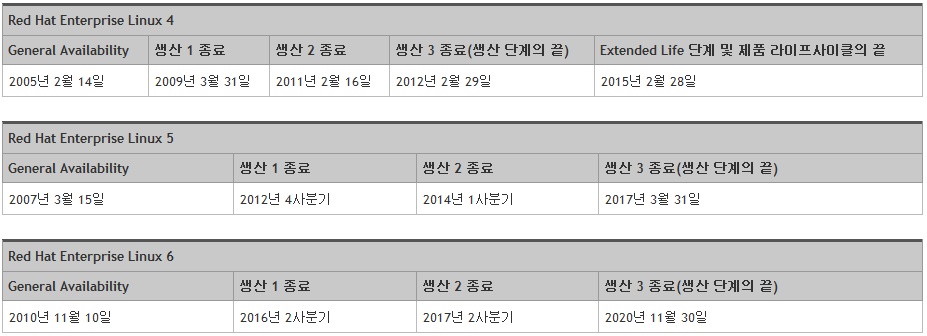
Redhat의 RHEL4가 생산이 중단이 되었습니다. 즉 더이상 커널 패치 및 어플 패치를 제공하지 않는다는 것입니다.

https://access.redhat.com/support/policy/updates/errata/

같은 RPM을 사용하고 있는 CentOS4의 경우에는 같은 운명을 가지고 있습니다.
아래의 사이트에서 보면 http://vault.centos.org/4.9/ 에서 마지막 패키지를 제공하고 있습니다.

http://lists.centos.org/pipermail/centos-announce/2012-February/018462.html

하지만 아직도 여전히 많은 시스템들이 CentOS 4 기반으로 운영이 되고 있기 때문에 2012년 2월까지 만들어진 패키지를 이용해서 추가 설치를 할수 있어야 합니다. 하지만 기존의 설정을 그대로인 상태에서 패키지 관리자인 yum을 사용하게 되면 아래와 같은 에러로 사용을 할수가 없는 상황입니다.

[root@localhost ~]# yum list
Setting up repositories
not using ftp, http[s], or file for repos, skipping - 4 is not a valid release or hasnt been released yet
Cannot find a valid baseurl for repo: update
Error: Cannot find a valid baseurl for repo: update
[root@localhost ~]#

이런 경우에는 아래와 같이 /etc/yum.repos.d/CentOS-Base.repo 파일을 수정해서 사용하면 됩니다.
(참고: https://www.centos.org/modules/newbb/viewtopic.php?topic_id=36528&forum=27)

[localhost(root):/etc/yum.repos.d]# diff -Nu CentOS-Base.repo.120418 CentOS-Base.repo
--- CentOS-Base.repo.120418     2012-04-18 10:47:11.000000000 +0900
+++ CentOS-Base.repo    2012-04-18 10:50:12.000000000 +0900
@@ -13,8 +13,9 @@
 
 [base]
 name=CentOS-$releasever - Base
-mirrorlist=http://mirrorlist.centos.org/?release=$releasever&arch=$basearch&repo=os
+#mirrorlist=http://mirrorlist.centos.org/?release=$releasever&arch=$basearch&repo=os
 #baseurl=http://mirror.centos.org/centos/$releasever/os/$basearch/
+baseurl=http://vault.centos.org/4.9/os/$basearch
 gpgcheck=1
 gpgkey=http://mirror.centos.org/centos/RPM-GPG-KEY-centos4
 priority=1
@@ -23,8 +24,9 @@
 #released updates
 [update]
 name=CentOS-$releasever - Updates
-mirrorlist=http://mirrorlist.centos.org/?release=$releasever&arch=$basearch&repo=updates
+#mirrorlist=http://mirrorlist.centos.org/?release=$releasever&arch=$basearch&repo=updates
 #baseurl=http://mirror.centos.org/centos/$releasever/updates/$basearch/
+baseurl=http://vault.centos.org/4.9/os/$basearch
 gpgcheck=1
 gpgkey=http://mirror.centos.org/centos/RPM-GPG-KEY-centos4
 priority=1
@@ -33,8 +35,9 @@
 #packages used/produced in the build but not released
 [addons]
 name=CentOS-$releasever - Addons
-mirrorlist=http://mirrorlist.centos.org/?release=$releasever&arch=$basearch&repo=addons
+#mirrorlist=http://mirrorlist.centos.org/?release=$releasever&arch=$basearch&repo=addons
 #baseurl=http://mirror.centos.org/centos/$releasever/addons/$basearch/
+baseurl=http://vault.centos.org/4.9/os/$basearch
 gpgcheck=1
 gpgkey=http://mirror.centos.org/centos/RPM-GPG-KEY-centos4
 priority=1
@@ -43,8 +46,9 @@
 #additional packages that may be useful
 [extras]
 name=CentOS-$releasever - Extras
-mirrorlist=http://mirrorlist.centos.org/?release=$releasever&arch=$basearch&repo=extras
+#mirrorlist=http://mirrorlist.centos.org/?release=$releasever&arch=$basearch&repo=extras
 #baseurl=http://mirror.centos.org/centos/$releasever/extras/$basearch/
+baseurl=http://vault.centos.org/4.9/os/$basearch
 gpgcheck=1
 gpgkey=http://mirror.centos.org/centos/RPM-GPG-KEY-centos4
 priority=1
@@ -53,8 +57,9 @@
 #additional packages that extend functionality of existing packages
 [centosplus]
 name=CentOS-$releasever - Plus
-mirrorlist=http://mirrorlist.centos.org/?release=$releasever&arch=$basearch&repo=centosplus
+#mirrorlist=http://mirrorlist.centos.org/?release=$releasever&arch=$basearch&repo=centosplus
 #baseurl=http://mirror.centos.org/centos/$releasever/centosplus/$basearch/
+baseurl=http://vault.centos.org/4.9/os/$basearch
 gpgcheck=1
 enabled=0
 gpgkey=http://mirror.centos.org/centos/RPM-GPG-KEY-centos4
@@ -64,8 +69,9 @@
 #contrib - packages by Centos Users
 [contrib]
 name=CentOS-$releasever - Contrib
-mirrorlist=http://mirrorlist.centos.org/?release=$releasever&arch=$basearch&repo=contrib
+#mirrorlist=http://mirrorlist.centos.org/?release=$releasever&arch=$basearch&repo=contrib
 #baseurl=http://mirror.centos.org/centos/$releasever/contrib/$basearch/
+baseurl=http://vault.centos.org/4.9/os/$basearch
 gpgcheck=1
 enabled=0
 gpgkey=http://mirror.centos.org/centos/RPM-GPG-KEY-centos4
[localhost(root):/etc/yum.repos.d]#

저는 이렇게 해서 기존의 CentOS에서 jar 파일을 생성하기 위해서 java-1.4.2-gcj-compat-devel-1.4.2.0-27jpp 패키지를 yum으로 설치하여 jar 프로그램을 사용할 수 있었습니다.
Print Friendly
Apr 172012
 

SVN을 사용하여 기존에 개발된 소스 디렉토리를 추가하는 경우가 많습니다.
하지만 기존의 디렉토리 구조가 SVN에 적합하지 않거나, 일부분만 SVN과 연동을 하고자 하는 경우가 있습니다.

이런 경우에 처리하기가 좀 곤란해서 여러가지 꼼수를 사용했는데요. 아래와 같이 “svn add -N” 명령어로 간단하게 해결이 가능합니다.


[root@localhost~]# svn help add
add: 파일과 디렉토리를 버전관리 대상에 넣습니다. 저장소에
추가하도록 스케쥴링 되며, 다음 커밋할 때, 추가됩니다.
사용법: add PATH...

옵션:
  --targets ARG            : ARG로 주어진 파일 내용을 옵션으로 추가합니다
  -N [--non-recursive]     : obsolete; try --depth=files or --depth=immediates
  --depth ARG              : 적용할 단계를 제한합니다. 가능한 인자 ('empty', 'files',
                            'immediates', or 'infinity')
  -q [--quiet]             : 아무것도 출력하지 않거나, 요약 정보만 출력합니다
  --force                  : 강제로 실행합니다
  --no-ignore              : svn:ignore로 지정한 것과 디폴트로 무시하는 파일들을 무시하지 않습니다
  --auto-props             : 자동 속성기능을 활성화합니다
  --no-auto-props          : 자동 속성기능을 비활성화합니다
  --parents                : 임시 상위개체 삽입

글로벌 옵션:
  --username ARG           : arg를 접속에 필요한 사용자 ID로 사용합니다
  --password ARG           : arg를 접속에 필요한 패스워드로 사용합니다
  --no-auth-cache          : 인증 정보를 캐시에 저장하지 않습니다
  --non-interactive        : 대화식 사용자 입력을 기다리지 않습니다
  --trust-server-cert      : accept unknown SSL server certificates without
                             prompting (but only with '--non-interactive')
  --config-dir ARG         : arg로 지정된 디렉토리에서 사용자 구성화일을 읽습니다
  --config-option ARG      : set user configuration option in the format:
                                 FILE:SECTION:OPTION=[VALUE]
                             For example:
                                 servers:global:http-library=serf

Print Friendly
Apr 172012
 

HTTP/1.1 에서 Cache와 관련된 헤더중에 If-Modified-Since와 ETag를 사용하는 방법이 있습니다.

ETag에 대한 설명은 아래에서 확인이 가능합니다.

http://en.wikipedia.org/wiki/HTTP_ETag

여기서 궁금한 것은 국내에서 많이 사용하고 있는 Apache 웹서버에서는 ETag 값을 어떻게 생성하는지가 궁금해서 소스를 다운받아서 확인을 해봤다.

아래 주석에서와 같이 inode-size-mtime 으로 구성이 하되, hex 값으로 변환을 해서 사용하도록 되어 있습니다. 물론 filetype이 0인 경우에는 mtime값만을 사용하는 것을 149라인에서 확인을 할수 있다.

    113     if (r->finfo.filetype != 0) {
    114         /*
    115          * ETag gets set to [W/]"inode-size-mtime", modulo any
    116          * FileETag keywords.
    117          */
    118         etag = apr_palloc(r->pool, weak_len + sizeof("\"--\"") +
    119                           3 * CHARS_PER_UINT64 + 1);
    120         next = etag;
    121         if (weak) {
    122             while (*weak) {
    123                 *next++ = *weak++;
    124             }
    125         }
    126         *next++ = '"';
    127         bits_added = 0;
    128         if (etag_bits & ETAG_INODE) {
    129             next = etag_uint64_to_hex(next, r->finfo.inode);
    130             bits_added |= ETAG_INODE;
    131         }
    132         if (etag_bits & ETAG_SIZE) {
    133             if (bits_added != 0) {
    134                 *next++ = '-';
    135             }
    136             next = etag_uint64_to_hex(next, r->finfo.size);
    137             bits_added |= ETAG_SIZE;
    138         }
    139         if (etag_bits & ETAG_MTIME) {
    140             if (bits_added != 0) {
    141                 *next++ = '-';
    142             }
    143             next = etag_uint64_to_hex(next, r->mtime);
    144         }
    145         *next++ = '"';
    146         *next = '\0';
    147     }
    148     else {
    149         /*
    150          * Not a file document, so just use the mtime: [W/]"mtime"
    151          */
    152         etag = apr_palloc(r->pool, weak_len + sizeof("\"\"") +
    153                           CHARS_PER_UINT64 + 1);
    154         next = etag;
    155         if (weak) {
    156             while (*weak) {
    157                 *next++ = *weak++;
    158             }
    159         }
    160         *next++ = '"';
    161         next = etag_uint64_to_hex(next, r->mtime);
    162         *next++ = '"';
    163         *next = '\0';
    164     }

아래는 실제 Apache 서버에서 받은 HTTP 헤더에 들어 있는 ETag 값입니다.

위의 ETag 값을 검증해보기 위해서 마지막에 있는 0467ddaad 값을 10진수로 변환을 하고, 해당 값을 Unix Timestamp로 변환을 해보면 다음과 같이 확인이 가능합니다.

Print Friendly
Apr 122012
 

SVN을 RPM으로 설치하면 시스템 재시작시 실행해주는 스크립트가 들어가 있지 않다.
이런 경우 대부분 /etc/rc.d/rc.local 에 넣어서 처리를 하는 경우가 대부분인데. 이번에 설치한 CentOS 서버에서는 /etc/rc.d/rc.local 이 제대로 작동하지 않아서 스크립트를 찾아보니 없어서 하나 만들었다.

#!/bin/bash
#
# svnserve        Startup SVN Server
#
# chkconfig: - 85 15
# processname: svnserve
# config: none
# pidfile: /var/run/svnserve.pid
 
# Source function library.
. /etc/rc.d/init.d/functions
 
# Path to the apachectl script, server binary, and short-form for messages.
svnserve=/usr/bin/svnserve
prog=svnserve
pidfile=/var/run/svnserve.pid
logfile=/var/log/svnserve
repository=/home/svn
OPTIONS="-d -r $repository --pid-file $pidfile --log-file $logfile"
RETVAL=0
 
start() {
        echo -n $"Starting $prog: "
        daemon --pidfile=${pidfile} $svnserve $OPTIONS
        RETVAL=$?
        echo
        return $RETVAL
}
 
stop() {
        echo -n $"Stopping $prog: "
        killproc -p ${pidfile}
        RETVAL=$?
        echo
        [ $RETVAL = 0 ] && rm -f ${pidfile}
}
 
# See how we were called.
case "$1" in
  start)
        start
        ;;
  stop)
        stop
        ;;
  restart)
        stop
        start
        ;;
  *)
        echo $"Usage: $prog {start|stop|restart}"
        RETVAL=2
esac
 
exit $RETVAL

위와 같은 파일을 /etc/init.d/svnserve 로 생성을 하고, 아래와 같이 서비스 등록을 해주면 된다.

[root@localhost ~]# chmod 755 /etc/init.d/svnserve
[root@localhost ~]# chkconfig --add svnserve 
[root@localhost ~]# /sbin/runlevel
N 3
[root@localhost ~]# chkconfig --level 3 svnserve on

참고로 데스크탑으로 설정한 경우에는 Run Level에 5이므로 level을 5로 설정해야 한다.

아래와 같이 사용을 하면 된다.

[root@localhost log]# /etc/init.d/svnserve stop
svnserve 를 정지 중:                                       [  OK  ]
[root@localhost log]# /etc/init.d/svnserve start
svnserve (을)를 시작 중:                                   [  OK  ]
[root@localhost log]# /etc/init.d/svnserve restart
svnserve 를 정지 중:                                       [  OK  ]
svnserve (을)를 시작 중:                                   [  OK  ]
[root@localhost log]#
Print Friendly
Apr 092012
 

svn을 linux/unix 환경에서 사용하는 경우에 checkout을 처음 할때 서버의 계정과 클라이언트의 접속 계정이 다른 경우가 있습니다. 이런 경우에는 패스워드를 저장해두면 편리합니다. 다만 해당 계정이 다른 사람이 접근을 하게 된다면 문제가 되겠지만요.

일단 svn을 사용하게 되면 ~/.subversion 이라는 디렉토리가 생성이 됩니다.
해당 디렉토리에서 plaintext 형태로 패스워드를 저장할지를 선택해두면 편리하게 이용이 가능하다.

[root@localhost public_html]# diff ~/.subversion/servers.org ~/.subversion/servers
156c156
< # store-plaintext-passwords = no
---
> store-plaintext-passwords = yes
Print Friendly
Plugin from the creators of Brindes :: More at Plulz Wordpress Plugins